
By Tan, Electrical Engineer @Transformer4U | January 22, 2026
🔧 Quick Answer
Transformer oil seepage can be fixed using three main methods:
- Sealant Application: For minor seepage on cracks/pinholes – use oil-resistant epoxy
compounds - Gasket Replacement: For flange/cover leaks – use NBR (Nitrile) gaskets, torque
diagonally - Injection Sealing: For inaccessible gaskets – drill access holes and inject sealant
compound
Critical Rule: ALWAYS de-energize before repair. Never use EPDM gaskets with mineral
oil.
Seepage vs. Leak: Understanding the Difference
Before starting any repair, it’s essential to correctly assess the severity:
| Characteristic | Seepage (Minor) | Leak (Moderate-Severe) |
|---|---|---|
| Visual Appearance | Wetness, oil film, slight staining | Active dripping, oil streams, puddles |
| Oil Loss Rate | < 0.5 liter/week | > 0.5 liter/week |
| MOG Gauge Change | Slow decline over weeks/months | Noticeable drop in days |
| Urgency | Schedule repair at next outage | Urgent – plan immediate outage |
| Repair Method | Sealant often sufficient | Gasket replacement required |
For comprehensive diagnosis techniques, see our Oil
Leak Detection Guide.
Common Seepage Locations
Based on our maintenance experience, here are the most frequent seepage points:
| Location | Typical Cause | Repair Difficulty |
|---|---|---|
| Radiator header flanges | Gasket aging, thermal cycling | 🟢 Easy |
| Valve stems | Packing wear, infrequent operation | 🟢 Easy |
| Manhole/handhole covers | Gasket compression set | 🟡 Moderate |
| Bushing flanges | Seal deterioration | 🟡 Moderate |
| Pipe weld joints | Weld cracks, corrosion | 🔴 Complex |
| Tank weld seams | Stress cracks, manufacturing defects | 🔴 Complex |
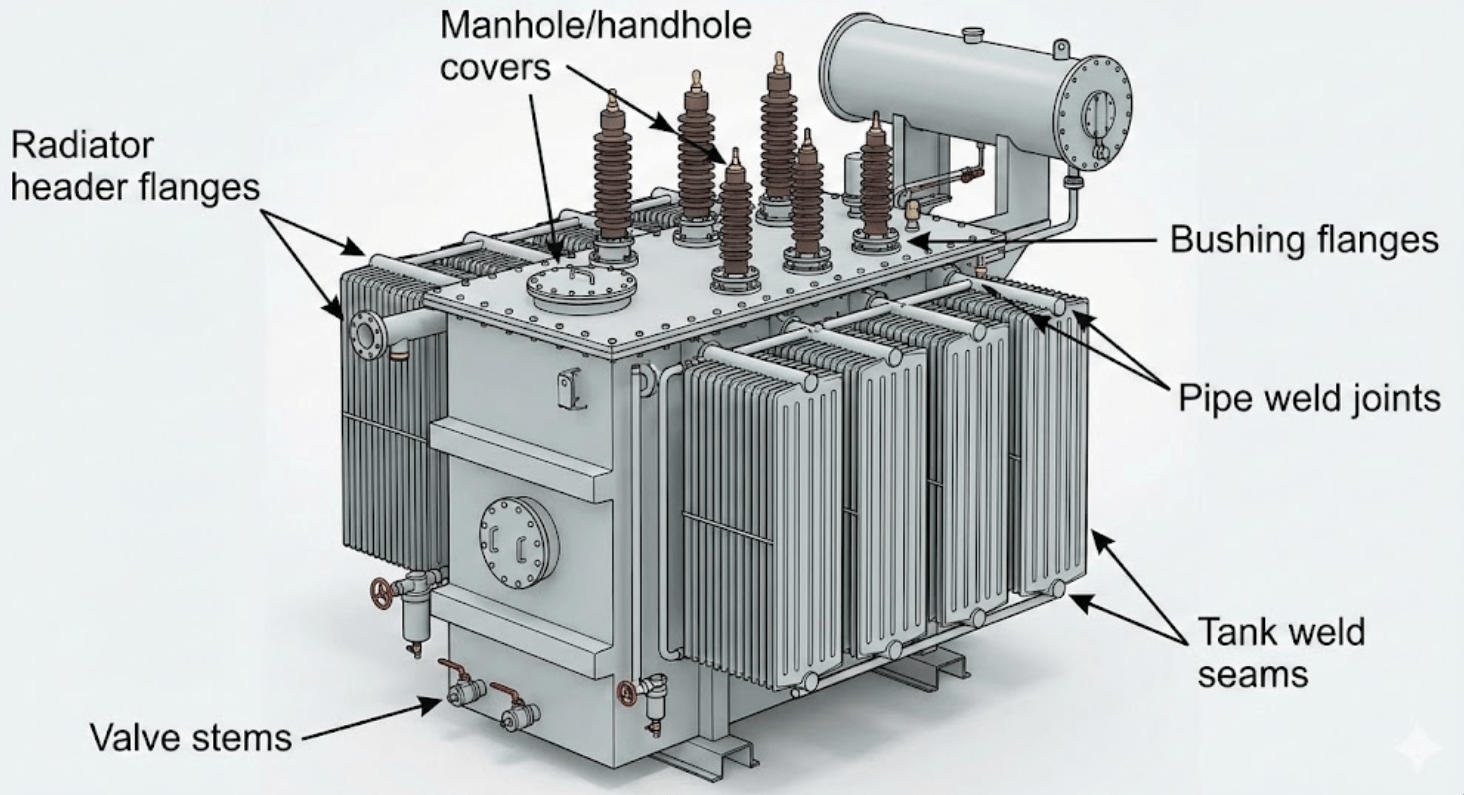
Diagram showing common oil seepage points on a power transformer
Tools and Materials Required
Essential Tools
Gasket Material Selection
| Material | Mineral Oil Compatibility | Temperature Range | Best For |
|---|---|---|---|
| NBR (Nitrile) | ✅ Excellent | -40°C to +120°C | All oil-wetted applications |
| Silicone | ✅ Good | -60°C to +200°C | Wide temperature variations |
| Cork-Nitrile | ✅ Good | -40°C to +120°C | Covers with irregular surfaces |
| Viton (FKM) | ✅ Excellent | -20°C to +200°C | High-temperature applications |
| EPDM | ❌ INCOMPATIBLE | N/A | ⚠️ NEVER use with mineral oil |
oil. EPDM will absorb hydrocarbons, swell, and fail. Always verify gasket material before installation.
When in doubt, use NBR (Nitrile).
Recommended Sealants
- Belzona 1212: Surface-tolerant epoxy for oil-wet surfaces
- PowerPatch System: Fast-curing putty + permanent resin (good for active seepage)
- Steel-reinforced epoxy: For weld cracks and tank repairs
Method 1: Sealant Application (For Minor Seepage)
Suitable for: Cracks, pinholes, weeping welds, and small surface defects.
1 Safety & Isolation
- De-energize the transformer and apply lockout/tagout
- Allow to cool if recently loaded (wait minimum 4 hours)
- Verify isolation with voltage tester
- Set up containment for any oil spillage
2 Locate the Seepage Source
- Clean the entire suspected area with degreaser
- Check tank pressure gauge (should be 1.5-2 lbs at ambient temperature)
- If pressure low, repressurize with dry nitrogen to 3-5 psi
- Spray soapy water around suspected areas – bubbles indicate the leak point
- Mark all seepage points with chalk or marker
3 Surface Preparation
- Wipe away excess oil with lint-free cloth
- Roughen the surface using wire brush, grinding disc, or sandpaper (60-80 grit)
- Extend preparation area 2-3 cm beyond the defect
- Clean with degreaser—surface must be free of oil film
- Apply masking tape to delineate repair zone
4 Apply Sealant
For inactive (dry) seepage:
- Mix epoxy sealant per manufacturer instructions
- Apply directly to defect with spatula or brush
- Extend 1-2 cm beyond defect edges
- Allow to cure fully (typically 12-24 hours)
For active (wet) seepage:
- Apply fast-curing putty (e.g., PowerPatch putty) directly over the active seepage
- Hold under hand pressure for 5-7 minutes until hardened
- After putty cures, sand lightly and apply permanent epoxy resin over top
- Extend resin 1 cm beyond putty edges
5 Verification
- After full cure, re-pressurize tank to 3-5 psi with nitrogen
- Apply soapy water to repaired area
- Monitor for 10 minutes – no bubbles = successful repair
- Clean area and remove masking tape
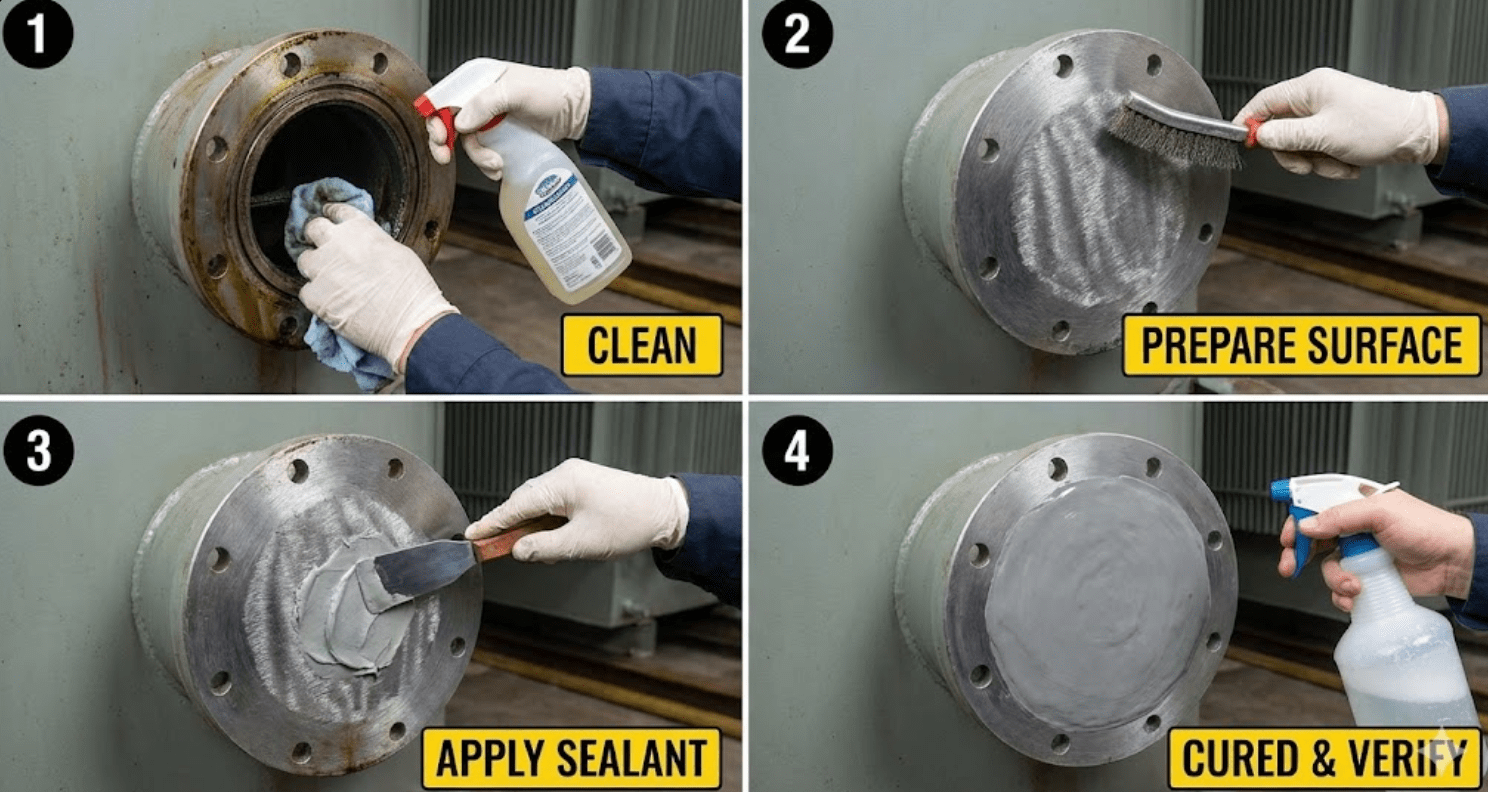
Step-by-step sealant application process for transformer oil seepage
Method 2: Gasket Replacement (For Flange Leaks)
Suitable for: Radiator flanges, covers, manholes, valve connections.
1 Preparation
- De-energize and isolate (as above)
- Obtain correct replacement gasket (verify material is NBR or compatible)
- Prepare oil containment (drip pans, absorbent pads)
- If gasket is below oil level, plan for oil drainage
2 Oil Management
- For above-oil-level repairs: No drainage needed
- For below-oil-level repairs: Drain oil to below the gasket level
- Use clean, dedicated oil pump and storage containers
- Protect drained oil from moisture and contamination
3 Remove Old Gasket
- Loosen bolts in reverse of tightening sequence (typically diagonal pattern)
- Remove bolts, noting their positions if different sizes/lengths
- Carefully separate the flanges
- Remove old gasket completely—do not leave fragments
- Clean mating surfaces with scraper and degreaser
- Inspect for corrosion, pitting, or damage to sealing surfaces
4 Install New Gasket
- Verify new gasket matches dimensions exactly
- Position gasket carefully—do not stretch or distort
- Apply thin film of transformer oil to gasket surface (aids sealing)
- Align flange and install bolts finger-tight
5 Torque Sequence
Critical: Tighten in diagonal/star pattern to ensure uniform compression:
- First pass: 30% of final torque, diagonal sequence
- Second pass: 60% of final torque, diagonal sequence
- Third pass: 100% of final torque, diagonal sequence
- Final check: Go around once in circular pattern
Consult manufacturer specifications for exact torque values. Typical range: 20-50 Nm depending on
bolt size.
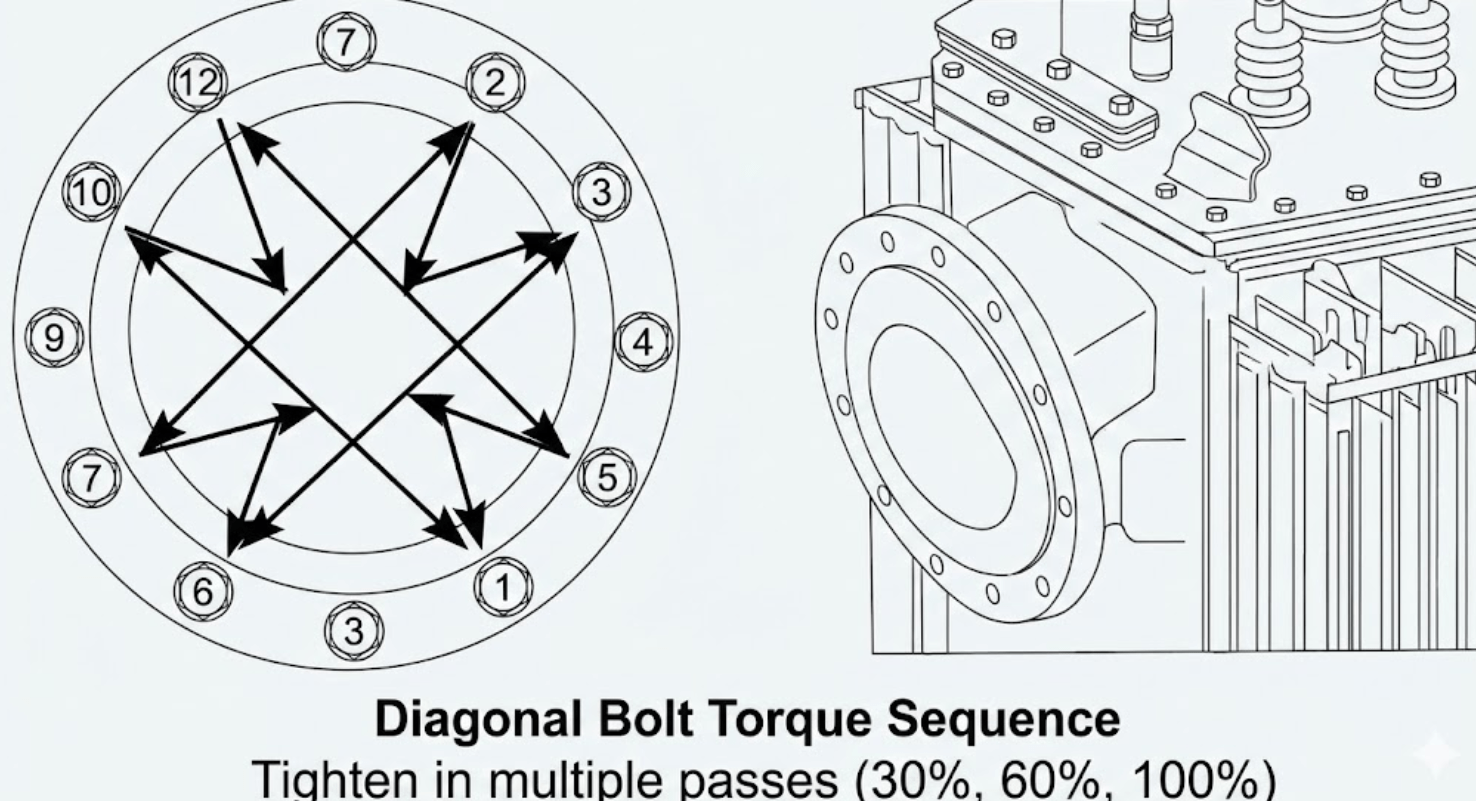
Diagonal bolt tightening sequence for gasket replacement
6 Refill and Test
- Refill oil to proper level (check MOG at 25°C reference)
- Pressurize tank to 3-5 psi with dry nitrogen
- Inspect for any seepage at new gasket
- Release air from radiator bleed plugs if applicable
- Perform oil dielectric test (BDV should be ≥30 kV per ASTM D877)
opposing bolts loose) to hold alignment while positioning. This prevents gasket damage from shifting
during installation.
Method 3: Injection Sealing (For Inaccessible Gaskets)
When complete gasket replacement isn’t feasible (e.g., gasket under oil, transformer cannot be drained),
injection sealing offers an alternative.
It requires proper equipment and training.
Procedure Overview
- Drill small access holes (2-3mm) into the gasket groove at intervals
- Insert injection fittings (Zerk-type or custom)
- Inject oil-resistant sealant compound under controlled pressure
- Sealant flows through the gasket groove, effectively creating a new seal
- Allow to cure, then remove excess and fittings
- Plug drill holes with threaded plugs or epoxy
This technique is especially valuable for large power transformers where oil drainage would take days and
risk contamination.
Post-Repair Testing Checklist
| Test | Purpose | Pass Criteria |
|---|---|---|
| Visual Inspection | Check for immediate seepage | No wetness or oil film after 24 hours |
| Pressure Test | Verify seal integrity | Holds 3-5 psi for 30 minutes without drop |
| Oil Level | Confirm no ongoing loss | Stable MOG reading over 1 week |
| Oil BDV Test | Ensure no contamination introduced | ≥30 kV (new); ≥25 kV (service) per ASTM D877 |
| Moisture Content | Check if moisture entered during repair | <20 ppm (new oil per IEC 60422); <35 ppm (service); >50 ppm requires action |
Prevention: Reducing Future Seepage
- Regular Inspection: Check all gaskets and flanges monthly; look for oil staining
- Bolt Re-torque: Re-torque flange bolts annually, especially after first year
- Gasket Proactive Replacement: Replace gaskets proactively after 15-20 years
- Silica Gel Maintenance: Keep breathers functional to prevent pressure cycling
- Oil Quality: Maintain oil in good condition—degraded oil accelerates seal
deterioration - Containment: Use secondary containment (bunds) to manage any future leaks per EPA
SPCC requirements
Frequently Asked Questions
How long does a sealant repair typically last?
A properly applied epoxy sealant repair can last 5-10 years or more under normal operating
conditions. Factors affecting longevity include surface preparation quality, sealant selection,
temperature cycling, and vibration exposure. Consider sealant repairs as semi-permanent solutions;
plan for eventual gasket replacement during major overhauls.
Can I apply sealant over an old sealant repair?
Yes, if the old sealant is well-adhered and stable. Roughen the existing sealant surface and extend
the new application beyond its edges. If the old sealant is cracked, peeling, or oil-soaked, remove
it completely before applying new material. Layering over failed sealant will not provide a lasting
repair.
What if the sealing surface is pitted or corroded?
Minor pitting can be compensated with thicker gaskets or additional sealant. For severe corrosion: 1)
Grind smooth if sufficient metal remains; 2) Build up with weld and re-machine for critical
surfaces; 3) Use conformable gasket materials (cork-nitrile) that fill irregularities. Severe damage
may require professional tank repair or replacement.
Is it necessary to drain all the oil for gasket replacement?
Not always. Only drain to below the level of the gasket being replaced. For above-oil-line gaskets
(some cover gaskets, certain flange connections), no drainage is needed. However, always be prepared
for oil spillage and have containment ready.
How do I document the repair for maintenance records?
Record: 1) Date and location of seepage; 2) Detection method used; 3) Repair method selected; 4)
Materials used (gasket part number, sealant batch); 5) Technician name; 6) Post-repair test results;
7) Before/after photographs. This documentation is valuable for tracking recurring issues and
planning maintenance.
Conclusion
Transformer oil seepage, while seemingly minor, demands prompt attention. Left unchecked, it leads to:
- Accelerated insulation aging from moisture ingress
- Environmental contamination and regulatory violations
- Potential for escalation to major leaks
With proper materials (NBR gaskets, compatible sealants), correct techniques (surface prep, diagonal
torquing), and thorough testing, most seepage repairs can be completed successfully during a single
outage.
Our field service team provides on-site diagnostics and repair services.